Tag Archives: sweets

Pavlova

The Pavlova was created in honor of the Russian ballet dancer Anna Matveyevna Pavlova after she toured Australia and New Zealand in the 1920’s. She was a renowned dancer, lauded for her grace and beauty. During the peak of her popularity many chefs would create desserts in her honor to coincide with her visits to their countries. Not surprisingly, these desserts would generally be light and airy to reflect her dancing style – eg. meringue based desserts, lights cakes and jellies.

The traditional Pavlova is one such dessert. However, there is some uncertainty as to whether it was first created in New Zealand or Australia. Anna Pavlova toured New Zealand in 1926 and Australia in 1929. Some food writers claim that before her 1926 visit, a recipe had been published in New Zealand for a fruit filled meringue pie. A chef in the hotel she had been staying in apparently used this recipe but created the augmented base after being inspired by her ballet tutu. However, in 1935, a hotel chef Herbert Sachse from Western Australia apparently claimed that he created the modern Pavlova after building upon a recipe for a Meringue Cake which he saw in the Women’s Mirror Magazine April 2, 1935 edition. This recipe was submitted by a contributor from New Zealand. It appears though, that Sachse was the one who actually named the new recipe Pavlova after he noted that the dessert was “as light as Pavlova”*. Consequently, the modern day Pavlova is an iconic dessert claimed by both countries and is a national dessert for both.

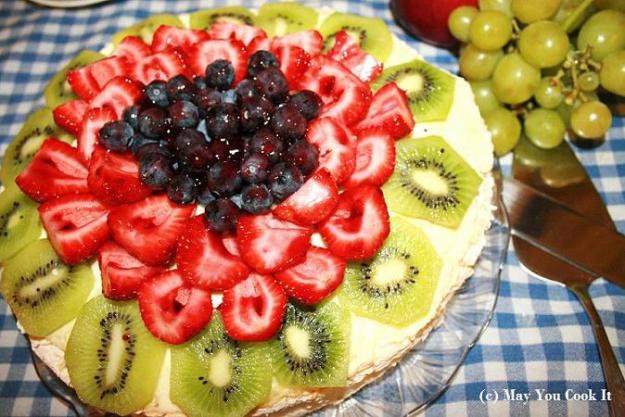
As its namesake suggests, it is incredibly light.  It’s a lovely dessert, particularly on a warm summer day. Today is also Australia Day and to honor this special day, I thought I would make this traditional Australian dessert. Ahhh…a restful day off, a cold drink and a slice of Pavlova….all I need now is to find a nice spot “under the shade of a coolabah tree”* and there’s little else I could ask for.

MYCI_Pavlova2

To make the Pavlova you’ll need:

6 eggwhites
1 Tbs cornflour
1 tsp cream of tartar
1 cup caster sugar
1 teaspoon vinegar
Vanilla essence
400ml thickened cream
1 punnet strawberries
2-3 kiwifruit
1 punnet blueberries.
1/2 cup strawberry jam.

  1. Preheat the oven to 200 degrees celsius.
  2. Beat the egg whites and cream of tartar until soft peaks form. Gradually add the sugar and continue beating to a stiff peak. Add the vinegar then mix in the cornflour and vanilla essence.
  3. Line a cookie sheet with baking paper and pour in the meringue.
  4. Reduce the oven to 100 degrees and bake the meringue for about 1 hour. Turn off the oven and open the door slightly when the meringue is baked – leave it to cool completely.
  5. Carefully transfer the cooled meringue onto a serving platter.
  6. Whip the cream using an electric beater and pour over the cooled meringue base.
  7. Top with the sliced fruits.
  8. Heat the jam for a few seconds in a microwave then glaze the fruits with the melted jam.

Macarons

What is deliciously light, chewy, and can almost always guarantee a smile no matter how long or grey the day may be? What else but theMacaron ? The Lindt Chocolate Bar serves delicious macarons. I love to sink into one of their comfortable chairs with a coffee and macaron as the stress of the day is slowly replaced with contentment.

The macaron was arguably introduced to mainstream Sydney by superstar patissier Adriano Zumbo during his appearances in Master Chef Australia. Since then, his inner city cafe has become a mecca for foodies, pastry lovers and macaron seekers of all kinds.

The modern macaron that Adriano Zumbo introduced was developed by Pierre Desfontaines from the French pâtisserie Ladurée *. It consists of two almond meringue shells filled with buttercream, ganache or jam filling. When I first considered making them from scratch, I decided to reconsider that notion and examine it. They are notoriously difficult to make and require a lot of patience and perseverance. The thought of making these delicate brightly colored biscuits intimidated me. What if I put in all this effort only to have a batch of cracked, deflated cookies? Is it really worth the time and energy? Why bother making them when I can buy them from someone who knows how to make them already? But there the turning point lay – if I let this fear of failure stop me from trying to learn how to master the macaron, then I will spend the rest of my life never knowing this skill. The macaron loomed in my mind, a neon tinted fancy mockingly bwaking chicken…chicken.. ch-ch-chicken! I made up my mind. It was time to roll up my sleeves and get to work.

To make the macarons you’ll need:

Macaron Shells:
3 cups sifted icing sugar
3 cups ground almonds
5 egg whites (aged)
1/3 cup caster sugar
½ tsp cream of tartar
Flavouring and food colouring

Chocolate Ganache:
125g milk chocolate, broken into pieces
Approx 100 ml heavy cream

Untitled3

  1. Separate the yolks from the whites and leave the egg whites in the fridge to age for at least 24 hours.
  2. Using an electric blender, grind the almond and powered sugar together until very fine.
  3. Using an electric mixer, whisk the egg whites until foamy. Add the cream of tartar and keep whisking until soft peaks form. Gradually add the sugar and continue whisking until the sugar has dissolved.
  4. Stir in your preferred coloring and flavouring.
  5. Fold the almond and sugar mixture into the egg whites. Fold carefully, making sure the mixture is fully incorporated.
  6. Spoon the mixture into a piping bag fitted with a round 5mm nozzle. Pipe 2cm rounds onto a baking sheet lined with baking paper. Set meringue aside to dry for about 45 mins (this helps to reduce cracking)
  7. Preheat the oven to 150 degrees celsius and bake the macarons for about 15 mins or until firm when lightly tapped.
  8. Allow the macarons to cool on the tray. The macarons should lift from the baking paper easily, but if the bottoms are a little sticky, use a sharp knife to lift them.
  9. To make the ganache filling, heat the cream and pour it over the chocolate. Mix gently until the chocolate melts. Keep stirring until the mixture becomes smooth and creamy. Allow it to cool until the mixture thickens.
  10. Match up similarly sized macaron shells. Spoon the ganache into a pastry bag and pipe onto one half of the macaron shells before topping with the other macaron shell.

Pineapple Upside Down Cake

I broke my stand mixer not too long ago and this precipitated a need to buy a new one. I’ve wanted a KitchenAid mixer for a while now but had never bought one because it seemed so extravagant. They’re a bit costly here in Australia ranging from $650 – $1200 each. However, since I needed to replace my mixer anyway, and I want one that will last a long time, I decided to take the plunge and buy the long desired KitchenAid. I have to admit I’m happy I did. I chose the “ice” colored mixer from the Artisan range but it strikes me as more of a duck egg blue. I didn’t really want the iconic red and my eye was consistently drawn to this lovely light green/blue color. It’s a beautiful piece of equipment and I was excited to try it out when it was delivered.

IMG_3540

For its inaugural task, I decided to bake a Pineapple Upside Down CakeThis cake is the first thing I learned to bake, so it seemed fitting that it should be the first thing my dream mixer should make hehe. I was eight years old and eager to take on Yan Can Cook when I learned this recipe. Problem was, I wasn’t allowed to play around the kitchen yet. After a prolonged campaign of  pestering, I finally succeeded in convincing my mother to let me bake. We made a Pineapple Upside Down Cake together. Well, at least my mother did. I made a mess, but I did mix the batter and added ingredients every now and then.  I didn’t do much in terms of cooking that day and never did develop the skills to take on Mr Yan, but I did have a great time. Albeit under the watchful eye of my mother, who was determined to stop me from enjoying myself to the full in her constant efforts to keep me from falling off the chair, falling into the batter or burning myself, the kitchen or the house down.

This cake is pretty simple to make and very tasty. To make it, you’ll need:

2 cups self-raising flour
1 cup softened butter
1 cup white or caster sugar
1 teaspoon vanilla essence
3 large eggs
1/2 cup milk
1 can pineapple pieces
1 packed cup brown sugar
1/2 cup softened butter (extra)
Maraschino cherries

IMG_3543

Instructions

  1. Preheat the oven to 180°C and grease a 20cm round cake tin using the 1/2 cup extra butter.
  2. Sprinkle the brown sugar over the base of the tin and arrange the pineapple pieces and maraschino cherries evenly on top.
  3. Beat the butter, vanilla and sugar until the mixture is light and creamy.
  4. Add the eggs gradually, beating well after each addition.
  5. Sift the flour over the mixture, adding alternatively with the milk.
  6. Pour the batter over the pineapple, sugar and maraschino cherries.
  7. Bake for 40-45 minutes or until a skewer inserted in the middle of the cake comes out clean.
  8. Cool the cake in the pan for a few minutes before turning it over onto a plate.

pineapple

Chocolate Cupcakes

I recently had occasion to make cupcakes and I thought this time I’d use some white chocolate frosting..I love chocolate in any way, shape or form and I like the taste of the chocolate frosting better than buttercream. Of course, the only appropriate topping would have to be more chocolate :-) 
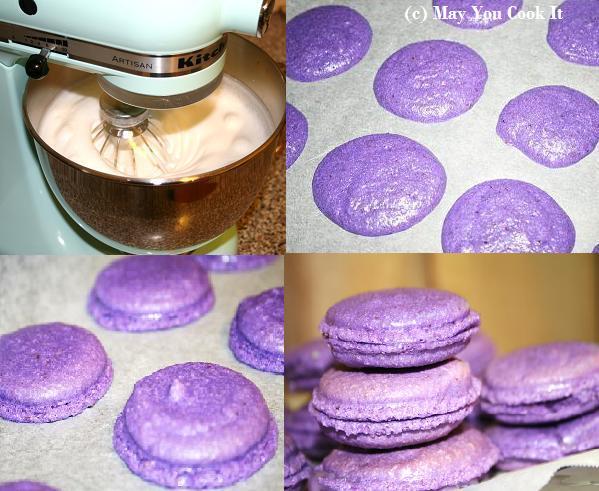
This time in cookie form, hehe.

IMG_3309-Copy

Cupcake 
1 cup water
1 cup brown sugar
100g milk chocolate
125g softened butter
3 eggs
1/4 cup cocoa powder
1 1/2 cups self-raising flour
1/2 cup plain flour

Frosting 
120 gms white chocolate melts.
1/4 hot water
2 cups icing sugar
100 gm butter
1 tsp vanilla extract
Chocolate cream cookies

  1. Preheat oven to 160 degrees celscius and line muffin pans.
  2. Combine the water and milk chocolate over low heat, stirring until the chocolate has melted. Set aside and cool to room temperature.
  3. Beat together the sugar and butter until pale and creamy. Add the eggs one at a time, beating well after each addition.
  4. Sift the flours and cocoa together. Gradually add into the sugar, butter and egg mixture, stirring until just combined.
  5. Stir in the melted chocolate and spoon into the prepared muffin pans.
  6. Bake for about 20 minutes or until the center bounces back when lightly tapped. Turn onto a wire rack to cool.
  7. To make the frosting, combine the white chocolate and hot water. Stir until the chocolate is melted.
  8. Sift the icing sugar into a large bowl. Add the butter and vanilla. Beat until smooth. Stir in the cooled white chocolate then place in the fridge until the frosting is firm enough to pipe.
  9. Place the frosting in an icing bag and pipe onto the cupcakes using a star tip.
  10. Cut some chocolate cream cookies in half and place on top of the frosted cupcakes.

Rocky Road Cupcakes

I have a long and abiding interest in cupcakes. I love their versatility and convenience – they’re relatively easy to transport and good for giving as gifts or packing as a treat for work. I also love to experiment with them….whether it’s to try out a new kind of icing, or going all out with the topping and having a candy sampler.

I recently experimented with this rocky road cupcake recipe and it definitely satisfied my sweet (sweeeeet) tooth. Actually the sweetness was a little too much for me….after one or two of the cupcakes, I felt like I was drifting in a haze of sugar induced semi-consciousness. I think next time I would consider using a cream cheese instead of buttercream icing which will hopefully offset the sweetness of the chocolate topping. At any rate, I thought the end result looked quite nice and it tasted delicious, although it was (did I mention?) very sweet.

IMG_3102-blog


Ingredients

1 cup water
1 cup brown sugar
100g milk chocolate
125g softened butter
3 eggs
1/4 cup cocoa powder
1 1/2 cups self-raising flour
1/2 cup plain flour

185g softened butter
2 cups icing sugar
Vanilla essence
About 1 cup mini marshmallows
2 bars Cherry ripe chocolate
chocolate sauce

Instructions

  1. Preheat oven to 160 degrees celscius and lightly oil or line muffin pans.
  2. Combine the milk chocolate and water over low heat. Set aside and cool to room temperature.
  3. Beat the sugar and butter until pale and creamy. Add eggs one at a time, beating well after each addition.
  4. Sift the self raising flour, cocoa and plain flour together. Add gradually into the mixture and stir until just combined.
  5. Stir in the melted chocolate and spoon into the prepared muffin pans.
  6. Bake for about 20 minutes or until the center bounces back when lightly tapped. Turn out onto a wire rack to cool.
  7. To make the icing, beat 185g butter until light and creamy. Gradually sift in the icing sugar and add vanilla essence. Refridgerate until needed.
  8. Chop the Cherry Ripe into small cubes.
  9. Pipe the buttercream onto the cooled cupcakes and top with the chopped Cherry Ripe and mini marshmallows. Sprinkle chocolate sauce on top of the cupcakes.


Sweet Cinnamon Rolls

Sweet cinnamon rolls are delicious served warm, soft and straight out of the oven. They’re great for breakfast or brunch, especially when served with a hot cup of coffee. However, like other brioche types of breads and sticky buns, these rolls are a little high on the butter and sugar content. For that reason, it’s best to have them as an occasional treat rather than a regular breakfast item. But if you’re like me and prefer to have these delicious rolls more often than occasionally, then I suggest that the best way to enjoy them is to eat them slowly….savor each morsel of the soft, warm bread and the sweet, chewy caramel filling…have one roll…then two ….if you really must, have three….. then get on the treadmill and run for your life.

Ingredients

Dough:
1/2 cup butter
1 teaspoon salt
3 eggs
5-6 cups self raising flour
2/3 cup milk
3/4 cup water
1 cup brown sugar
2 tablespoons instant yeast
2 teaspoon cinnamon

Filling:
1 cup brown sugar
3/4 cup butter
2 Tbs ground cinnamon
Ground peanuts

Glaze: 
1 cup powdered sugar
3 Tbs warm water
Vanilla essence

IMG_1795_blog

Instructions

  1. Combine the butter and sugar in a large bowl. Mix until light and fluffy. Gradually add in the eggs.
  2. Place the milk and water in a large saucepan. Heat over a low setting until it reaches about 37 degrees celcius.
  3. Combine the milk and water mixture with the batter. Add the cinnamon, yeast and salt. Mix the ingredients well.
  4. Gradually add in the flour, beating well.
  5. Turn the dough out onto a floured surface and knead for about 10-15 minutes until well blended.
  6. Place the dough into a well-oiled bowl and set aside to rest for about 1-1.5 hours.
  7. Turn the dough out onto a floured surface and roll out into a 14 x 20 inch rectangle.
  8. Using your fingers, gently cover the dough’s surface with the butter.
  9. Combine the brown sugar, ground peanuts and cinnamon for the filling. Sprinkle the filling over the buttered dough.
  10. Carefully roll the dough then pinch the seams, sealing it well.
  11. Liberally cover a large sheet tray with butter and sprinkle the bottom with brown sugar.
  12. Cut the dough into about 16 pieces and place onto the sheet tray.
  13. Cover the dough with cling wrap and allow it to rise for about 1.5 hours.
  14. Place in a preheated 175 degree (celcius) oven and bake for about half an hour.
  15. When the rolls have finished baking, remove from the oven and allow it to rest about 5 minutes.
  16. Combine the powdered sugar, water and vanilla essence to make the glaze. Turn the rolls out onto a serving platter and top with the

Bicho Bicho

Bicho Bicho is a traditional Filipino doughnut so good they had to name it twice. It’s great for breakfast especially served with a hot cup of coffee. Even better, its great dipped in melted chocolate. The only draw back is that it can be a little time consuming to make, so it’s best to cook it when you have adequate time. It’s a favourite Filipino sweet bread and most Filipino bakeries make them. Unfortunately, if there are no Filipino bakeries in your area, then you have a problem that only time and a bit of baking can solve. Or you can eat a regular cinnamon doughnut and dip it in melted chocolate – if you squint hard enough and use your imagination, it’s almost like a bicho bicho. But not quite.

IMG_2111_1

To make the real thing, first you have to wash your hands, roll up your sleeves and collect the following ingredients:

1 C lukewarm water
2 Tbs active dry yeast
1 tsp salt
2 C self raising flour

Combine the above ingredients in a large bowl and mix thoroughly. Cover and allow it to rise about 30 mins.

Add:

1/2 C melted butter.
2 eggs, beaten.
1 C sugar
2 C self raising flour

Beat the dough well. Cover and allow it to rise about 1.5 hours.

Punch the dough down. Turn out onto a floured surface and add more flour if the dough is too soft to handle.

Divide the dough into two portions.

Cover and allow it to rest for about 20 mins.

Roll out the dough to about 1/2 inch thickness. Cut into 8x 1 inch strips.

Cover and allow the dough to rise for about 1.5 hours.

Fry in hot oil until golden brown. Roll in caster sugar and serve warm.

Doughnuts

It’s getting noticeably cooler these days as Summer begins to make way for Autumn. The hot, balmy mornings are gradually being replaced by cool, fresh ones. It’s just the right weather for waking up to a tall cup of coffee and warm freshly made doughnuts on lazy weekend mornings.

IMG_1844
Most doughnut recipes take a long time to make and though its generally enjoyable to make traditional raised doughnuts, sometimes I just want to whip up a quick batch for breakfast. Thankfully, I’d come across a doughnut recipe in the past which I recently (and gratefully) dug out again. Its an uncomplicated recipe and great if you want to make doughnuts but do not have the time or inclination to make the traditional raised kind.

Ingredients

Doughnut 
1 cup milk
4 tsp yeast
1/4 cup sugar
2 cups self raising flour
1/2 cup sugar
1/2 cup mashed potatoes
4 Tbs oil

Chocolate Glaze 

1 cup icing sugar
2 Tbs hot water
2 Tbs melted butter
2 Tbs hot drinking chocolate

Cooking Instructions

  1. Heat milk until warm. Add yeast and 1/4 cup sugar. Allow it to stand about 10 minutes.
  2. In a large bowl, mix the flour, 1/2 cup sugar and mashed potatoes. Add the milk mixture and oil.
  3. Mix the dough well.
  4. Turn the dough out onto a floured surface and knead until the ingredients have combined well (about 8 minutes)
  5. Roll the dough to about 1/2 inch thick.
  6. Cut the doughnut shapes.
  7. Set the dough aside and prepare the glaze.
  8. Heat the oil then fry the doughnuts until golden (ensure your oil is about 375F to prevent the doughnuts becoming soggy).
  9. Drain the doughnuts on kitchen paper.
  10. Dip one side of the doughnut into the glaze and add sprinkles if desired.

Glaze

  1. Mix the icing sugar, water and butter until well combined.2
  2. Mix in the powdered chocolate. Add more or less to taste. If you prefer a thinner glaze, add a little more hot water to the mixture.
  3. Cover one side of the cooked doughnuts in glaze. You can also sprinkle toppings on top of the glaze if you prefer.

Serve warm.